Introduction: Why Installation Determines Project Success
In architectural projects, the installation of curved marble panels is as critical as their fabrication. Even the most precisely cut CNC or segmented panels can appear misaligned or unstable if the installation sequence, fixing methods, and joint control are not properly executed. This guide focuses on step-by-step strategies to ensure that curved marble panels achieve the intended design outcome, structural stability, and visual appeal.
Curved marble panel installation is widely applied in luxury interiors, commercial facades, and large residential projects. It includes both CNC curved marble panels and segmented curved marble panels, each requiring tailored on-site handling strategies. Before installation begins, it is essential to review the fabrication documentation from previous stages, including:
곡선형 대리석 패널 제작 가이드,
flat marble slabs to curved stone panels,
CNC curved marble panels, 그리고
segmented curved marble panels joint control.
Proper installation planning is mandatory. This includes reviewing delivery sequences, verifying joint dimensions, assessing slab weight, and ensuring that the fixing system is suitable for both wall or column applications. The installation strategy should be approved by both the design team and the fabrication team to prevent on-site errors.
Pre-Installation Preparation
Before any curved marble panel is installed, a detailed pre-installation checklist must be completed. This checklist ensures that each panel, whether CNC or segmented, is ready for immediate placement. The main items include slab verification, site condition assessment, fixing system preparation, and tool readiness.
Slab verification includes checking for any cracks, chips, or surface irregularities that may have occurred during transport. For segmented panels, each unit must be labeled according to the installation sequence. The site must be inspected to ensure that anchoring points are level and capable of supporting panel weight. Fixing hardware, such as brackets or clamps, should be tested for proper load-bearing capacity.
Fixing Methods for Curved Marble Panels
The choice of fixing method depends on panel type, radius, and installation environment. The main approaches include mechanical anchors, adhesive systems, and hybrid methods that combine both. Mechanical anchors are preferred for heavy CNC curved marble panels because they provide strong support and allow adjustment during installation. Adhesive systems are often used for segmented panels with moderate weight, where precise alignment is critical for visual continuity.
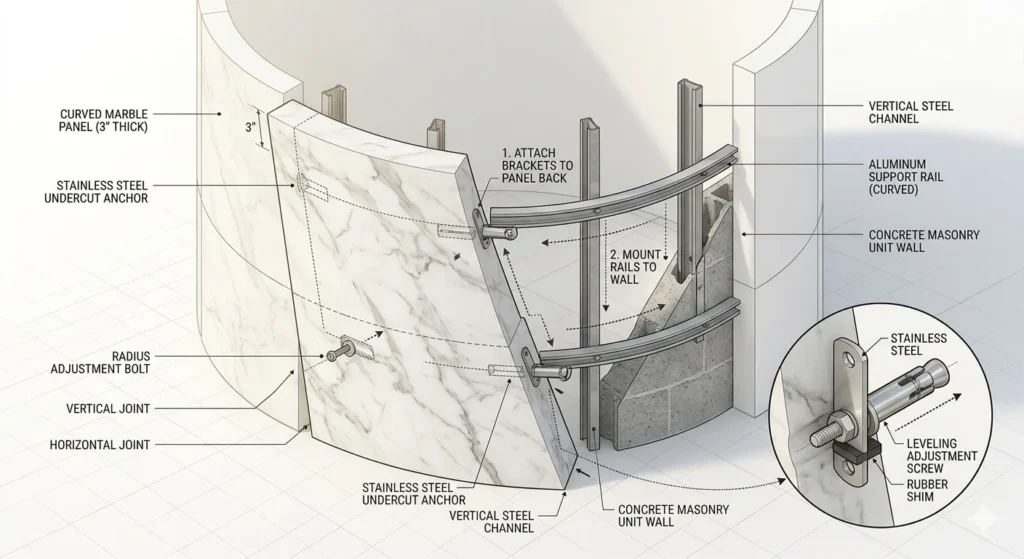
For hybrid systems, a combination of mechanical anchors and adhesive bedding ensures both structural integrity and seamless appearance. Anchor points must be positioned according to the design layout to evenly distribute load and prevent panel rotation or misalignment. For segmented panels, it is essential that each joint is properly aligned before the adhesive sets.
Sequencing and Layout Planning
Proper sequencing is critical for both visual effect and installation efficiency. Panels should be installed from a designated starting point, usually the bottom or a prominent reference line. Each subsequent panel must follow the planned order to maintain consistent curvature and minimize misalignment.
For large-scale segmented curved marble panels, a dry assembly is recommended before final fixing. This allows installers to verify the joint widths, angular placement, and overall radius. Any discrepancies can be corrected at this stage to prevent costly adjustments after adhesive curing or mechanical anchoring.
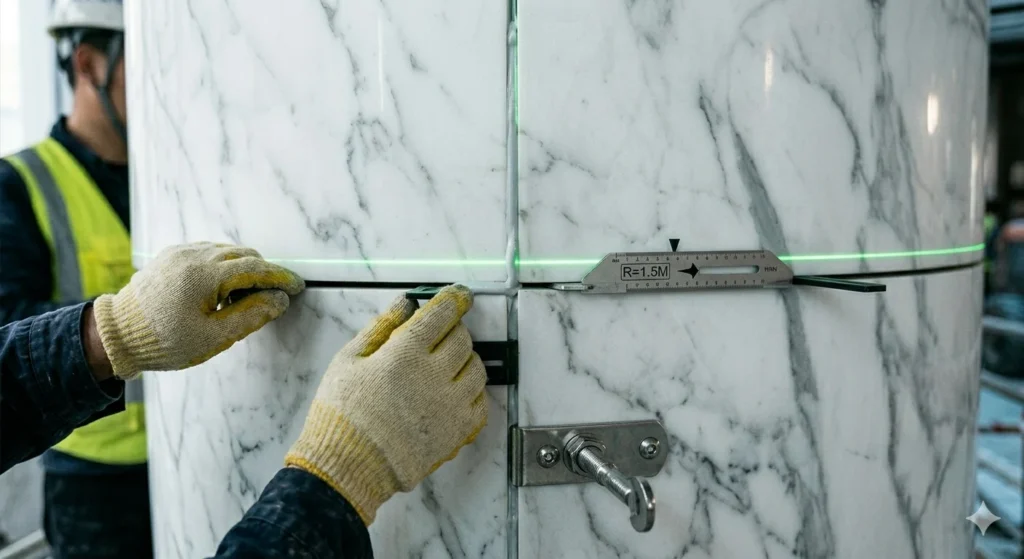
Joint Control During Installation
Joint control is essential to maintain a smooth visual appearance. The width, alignment, and depth of each joint must be consistently monitored throughout the installation process. Even minor deviations can accumulate, creating a noticeable unevenness in the curve.
To enhance joint control, installers often use temporary spacers or alignment guides. In some projects, a laser guide or reference template is employed to maintain consistent curvature and joint spacing across multiple panels. This technique ensures that both CNC and segmented panels meet design specifications.
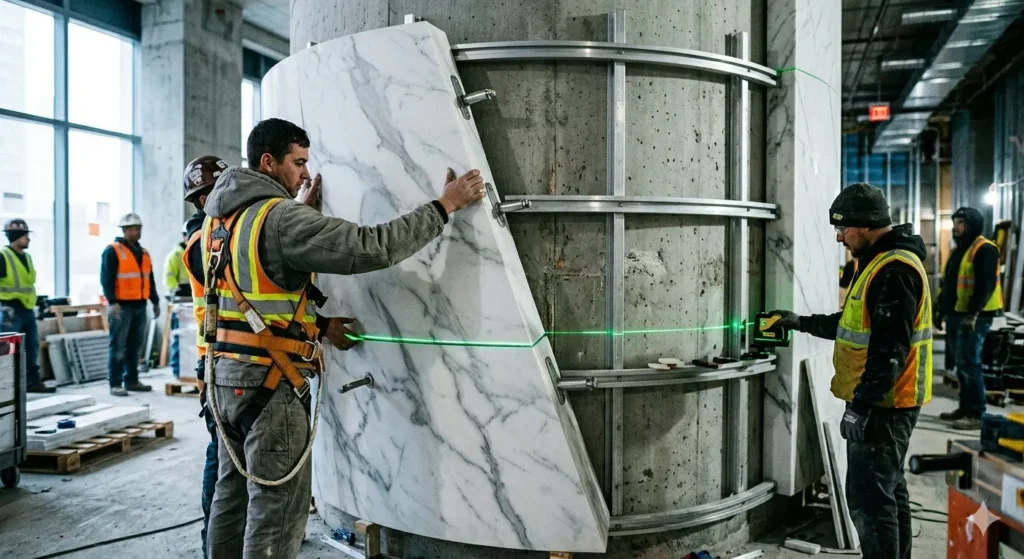
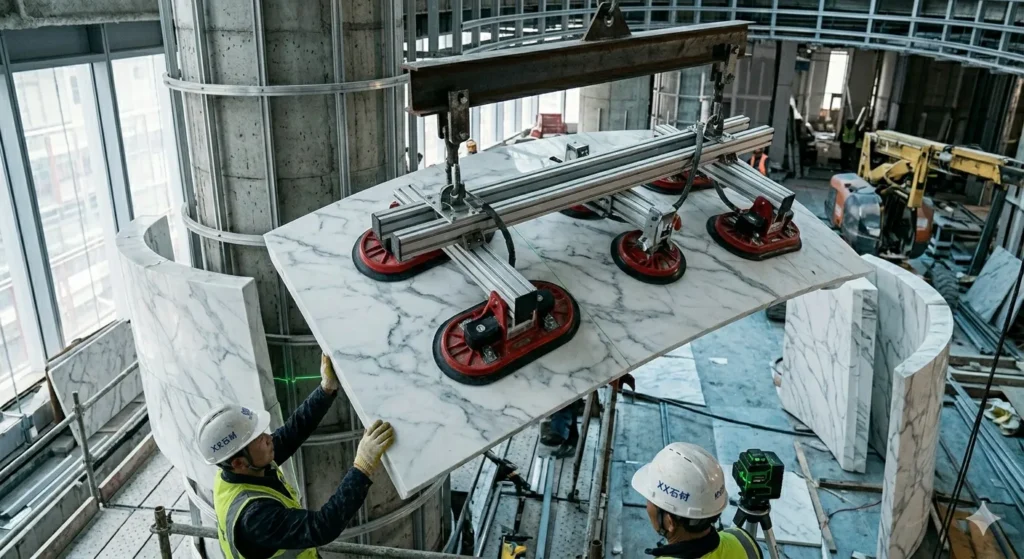
On-Site Handling of Curved Panels
Handling curved marble panels on-site requires specialized equipment and trained personnel. Panels must be lifted and positioned using vacuum lifters, cranes, or gantries depending on size and weight. For segmented panels, each segment must be carefully aligned and supported until permanently fixed.
During installation, care must be taken to prevent contact with abrasive surfaces or hard objects, which can cause chipping. Protective padding, edge guards, and careful transport along the installation path are standard practices in professional projects.
Surface Finishing and Alignment Verification
After panels are fixed, final surface finishing and alignment checks are performed. This includes polishing any joint lines, verifying that the curvature matches the design radius, and confirming that the panels are flush and visually continuous. For exterior applications, additional checks include water drainage, expansion gaps, and anchoring integrity.
High-end projects may require photogrammetry or 3D scanning to verify the alignment of curved marble panels. This ensures that even in complex facades, the curve maintains consistency from multiple viewpoints.
Common Problems During Installation
Some frequent issues encountered during curved marble panel installation include joint misalignment, uneven spacing, surface scratches, and incorrect panel sequencing. These problems often stem from poor pre-installation planning, inadequate training, or insufficient quality control.
Preventive measures include dry assembly, detailed labeling, use of laser guides, proper anchoring preparation, and training of the installation team. These steps are particularly critical for large segmented curved marble panels where cumulative errors can easily occur.
Installation Best Practices Table
| Step | Action | 목적 |
|---|---|---|
| 1 | Pre-installation slab inspection | Verify material quality and check for transport damage |
| 2 | Dry assembly layout | Ensure correct sequencing and joint alignment |
| 3 | Fixing method selection | Match panel weight and type to mechanical or adhesive system |
| 4 | On-site handling | Prevent damage during positioning |
| 5 | Final alignment verification | Confirm radius, flushness, and visual continuity |
자주하는 질문
1. What is the most critical factor in curved marble panel installation?
Joint control and sequencing are the most critical to ensure visual continuity and structural stability.
2. Can CNC and segmented panels be installed using the same methods?
Not exactly. CNC panels are usually heavier and require stronger mechanical anchors, whereas segmented panels often use adhesives combined with light anchors.
3. How can installation errors be prevented?
Pre-planning, dry assembly, labeling, and laser-guided alignment are essential preventive measures.
4. Is specialized equipment required?
Yes. Vacuum lifters, cranes, and gantries are recommended depending on panel size and weight.
5. Are there differences in installation between interior and exterior panels?
Yes. Exterior panels require additional checks for drainage, expansion gaps, and anchoring integrity.


