Quarzit-Trockenverlegung-Fotografie: Die gesamte Anlage in einer einzigen Aufnahme festhalten
Post navigation
Kurze Zusammenfassung
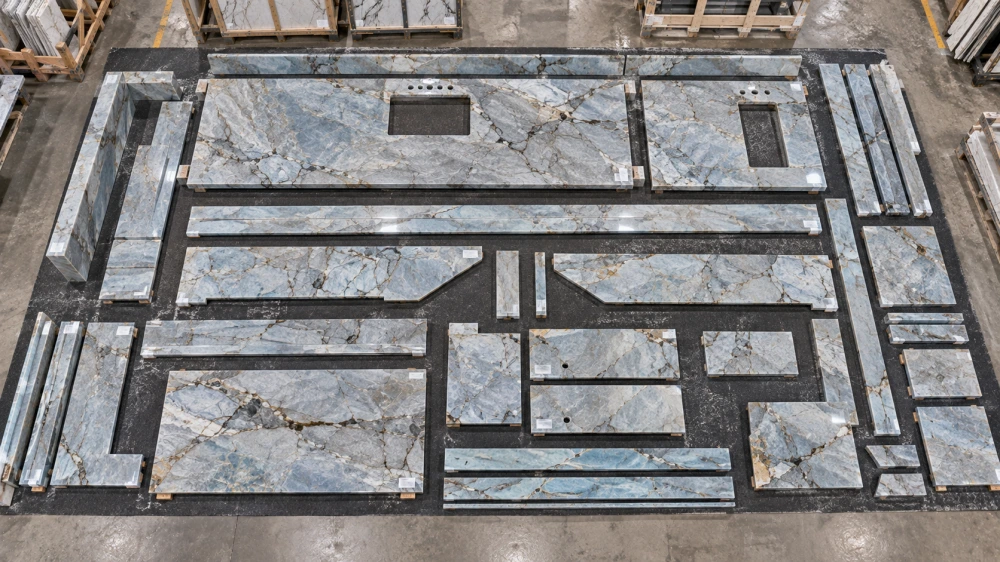
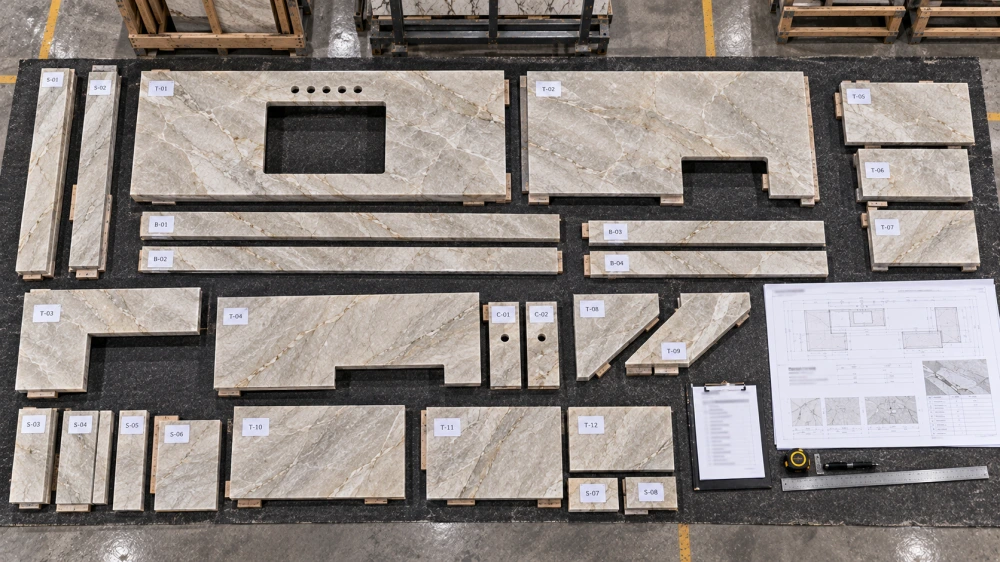
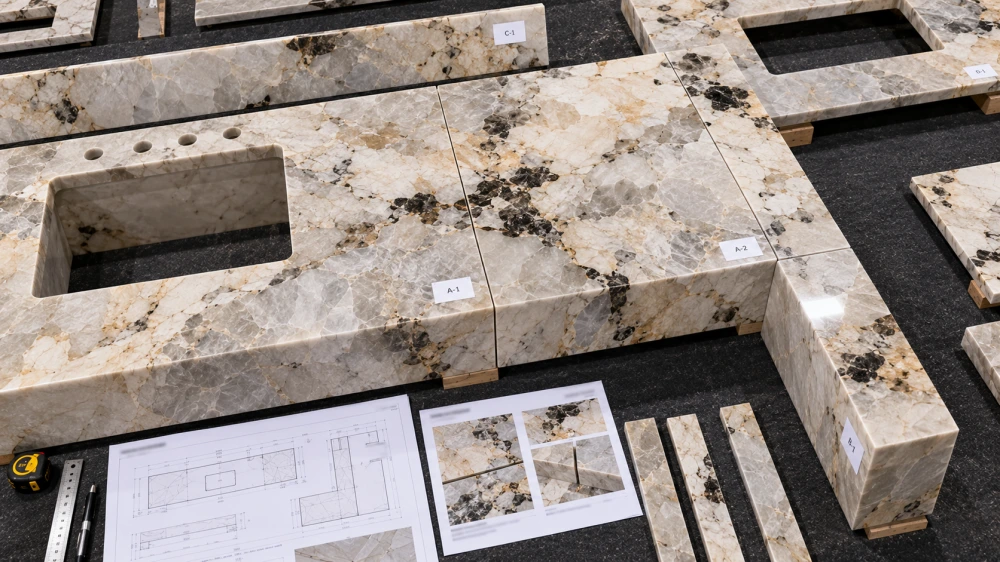
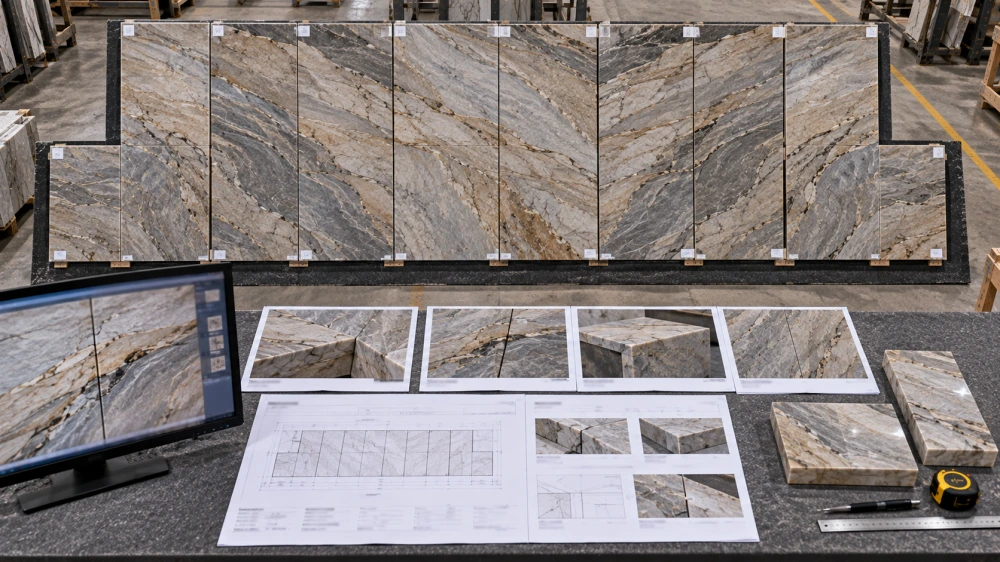
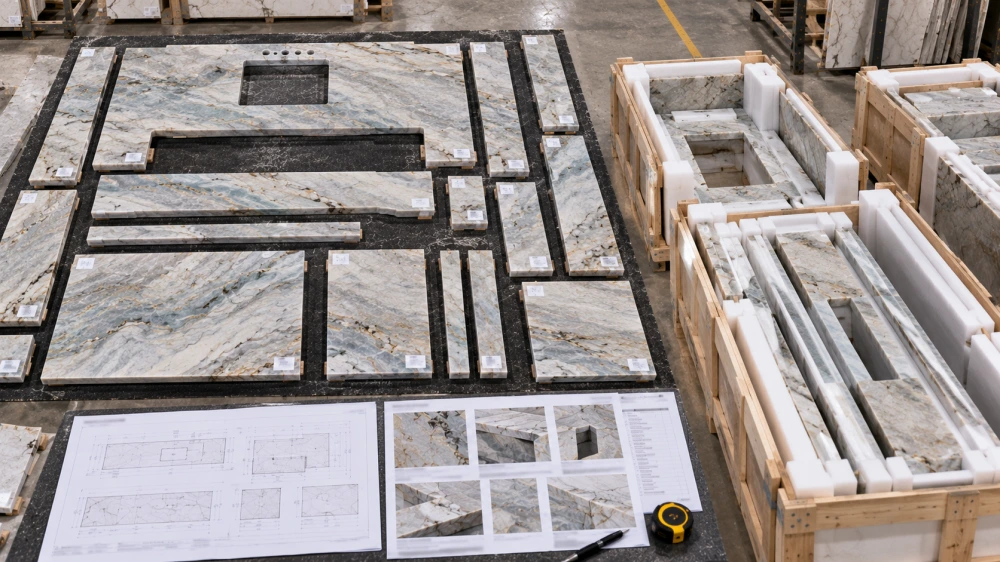
Bei der Trockenverlegung von Quarzit sollte die Fotografie das gesamte vorgeschlagene Set dokumentieren und nicht nur die attraktivsten Einzelstücke. Eine aussagekräftige Dokumentation kombiniert in der Regel eine Hauptaufnahme des gesamten Sets mit Angaben zu den einzelnen Teilen, der aktuellen Zeichnungsrevision, der Reihenfolge oder Blickrichtung, den Naht- und Rücklaufpositionen sowie gezielten Detailaufnahmen. Ziel ist es, Käufern, Designern, Verarbeitern oder Installateuren klar zu vermitteln, was genau begutachtet wurde, ohne das Projekt anhand vereinzelter Handyfotos rekonstruieren zu müssen.
Fotografie der Trockenverlegung von Quarzit wird besonders wertvoll, wenn ein Projekt aus natürlichem Quarzit mehrere gefertigte Elemente umfasst, die visuell harmonisch zusammenspielen müssen.
Eine Küche kann eine Inselplatte, Wasserfallplatten, Umrandungsschalen, Spritzschutzplatten und Rückläufe beinhalten. Ein Wandprojekt kann zwanzig oder mehr Platten umfassen. Eine Treppe kann Stufen, Setzstufen, Podeste, Randelemente sowie speziell geformte Bauteile enthalten.
Die separate Fotografie jedes einzelnen Teils zeigt nicht unbedingt, ob das Gesamtset als Komposition funktioniert.
Die nützlichste Dokumentation der Trockenverlegung beginnt daher mit einem Grundsatz:
Zunächst das gesamte Set festhalten. Detailaufnahmen dienen zur Erläuterung, nicht zum Ersatz.
Was soll eine Dokumentation der Trockenverlegung von Quarzit beweisen?
Eine Trockenverlegungsdokumentation sollte eine klar definierte Frage zur Optik oder zur Produktionskontrolle beantworten.
Begutachtungsfrage
Was die Fotografie zeigen sollte
Ist das gesamte Set vorhanden?
Hauptaufnahme des Gesamtsets und Referenzangaben zu den einzelnen Teilen
Verläuft das Muster logisch?
Reihenfolge, Ausrichtung, benachbarte Teile und Fugen
Sind sichtbare Übergänge akzeptabel?
Nähte, Gehrungen, Rückläufe, Randprofile und Flächenwechsel
Stimmen die Teile mit der aktuellen Zeichnung überein?
Zeichnungsrevision, Teilnummern und Anordnungsbeziehungen
Was muss noch überprüft werden?
Gezielte Detailaufnahmen und schriftliche Kommentare
Ein Ordner mit zwanzig ansprechenden Fotos, jedoch ohne Hauptaufnahme, Teilnummern oder Hinweise zur Revision, ist deutlich schwächer als ein kleinerer, kontrollierter Foto‑Set, der die Beziehung des Projekts klar darstellt.
1. Beginnen Sie mit einer Hauptaufnahme des Gesamtsets
Das wichtigste Bild ist in der Regel jene Aufnahme, die die vollständige Trockenverlegung in einer einzigen, leicht verständlichen Dokumentation zeigt.
mehrere Reihen von Bauteilen, angeordnet innerhalb eines einzigen sichtbaren Feldes; oder
eine kontrollierte, zusammengefügte Übersicht, wenn die physische Anordnung für eine einzige praktische Kameraposition zu groß ist.
Die Hauptaufnahme sollte genügend vom umliegenden Fabrikboden oder der Anordnungs‑Grenze zeigen, damit das Gesamtset verständlich wird.
Schneiden Sie nicht so eng, dass Randteile, Rückläufe, Randkomponenten oder kleinere nummerierte Bestandteile aus der Dokumentation verschwinden.
Regel des Gesamtsets
Wenn ein Begutachter anhand der Hauptaufnahme nicht erkennen kann, ob alle wichtigen Projektteile vorhanden sind, ist die Fotodokumentation unvollständig – selbst wenn die Nahaufnahmen hervorragend sind.
2. Ordnen Sie die Trockenverlegung gemäß der Projektlogik an
Die Trockenverlegung sollte keine zufällige Ansammlung fertiger Steinteile sein, die beliebig auf dem verfügbaren Boden platziert werden.
Sofern praktisch, ordnen Sie die Teile entsprechend der Art und Weise an, wie das Projekt verstanden werden soll:
von links nach rechts entlang der Wandhöhe;
Inselplatte gefolgt von Wasserfallplatten;
Arbeitsplatte gefolgt von Spritzschutz;
Treppenreihenfolge von der unteren zur oberen Etage;
Dies ist eine hilfreiche Denkweise für die Fotografie der Trockenverlegung: Das Foto dokumentiert eine Reihenfolge, die bereits eine projektbezogene Bedeutung besitzt.
3. Keep Piece IDs Visible and Stable
Every important component should have a stable piece reference.
The exact coding system can vary. What matters is consistency.
The same piece reference should be traceable across:
shop drawings;
cutting layouts;
dry-lay photography;
QC comments;
packing lists; and
installation references where required.
For directional materials, piece IDs are especially useful because a component can otherwise be accidentally rotated after fabrication.
4. Connect the Photography to the Current Drawing Revision
A dry-lay record should state which drawing or layout revision it represents.
This matters because one revision can change:
Fertigmaße;
piece quantity;
cutout positions;
die Position der Fugen;
panel divisions;
returns;
edge details; or
visible-face requirements.
If the project drawing changes after photography, the earlier record may remain historically useful but may no longer represent the current production layout.
TRACEABILITY CHAIN
Drawing Revision → Piece ID → Dry-Lay Position → Photo Record → Review Comment → Approval / Revision
5. Show Direction, Not Just Piece Position
A piece can be in the correct location and still be rotated incorrectly.
This is particularly important for quartzites with:
strong linear movement;
long mineral bands;
layered patterns;
major crystal structures;
bookmatched compositions; or
waterfall transitions.
Directional intent can be controlled through shop drawings, piece IDs, arrows, visible-face information, and actual slab layouts.
Dry-lay documentation becomes confusing when every image is rotated differently.
Where possible, establish one consistent orientation for the project record.
Zum Beispiel:
top of image = top of wall elevation;
left side of image = room entrance side;
island front always faces the lower side of the photograph; or
stair sequence always progresses left to right.
For projects where viewing direction matters, add the relevant direction to the drawing or photo index rather than expecting reviewers to remember how the camera was positioned.
9. Use Neutral, Repeatable Lighting
Dry-lay photography is a review tool, so dramatic photography is usually less useful than consistent documentation.
Where practical:
use even factory lighting;
avoid intense localized glare;
avoid heavy color casts;
do not intentionally oversaturate the stone;
keep camera processing consistent across the set; and
identify when two groups of photographs were taken under materially different conditions.
Natural Quartzite can contain subtle grey, cream, green, blue, gold, or translucent mineral areas. Uneven photography can make a normal slab-to-slab difference appear much larger—or smaller—than it actually is.
10. Do Not Crop Out Factory Context Completely
For aesthetic marketing photographs, a clean crop may be desirable.
For a technical dry-lay record, some context is useful.
A controlled amount of surrounding factory environment can help show:
where the whole set begins and ends;
whether smaller components are present;
the relative scale of long pieces;
separate groups or project zones; and
how components are physically positioned for review.
The goal is not to make the factory look untidy. It is to avoid turning a production record into an artificially isolated showroom image.
11. Dry Lay Is Especially Important for Multi-Piece Projects
The value of dry-lay photography increases as the number of visually connected pieces increases.
Feature-Wände
Large wall elevations benefit from whole-set photography because a buyer can review mineral movement, tone grouping, sequence, and joint rhythm across the complete composition.
Böden
Large floors can reveal sudden changes in pattern direction or tone that are difficult to understand from individual piece photographs.
Stair Packages
Treads, risers, landings, edge strips, and special pieces can be reviewed together and connected to the installation sequence.
Waterfall Islands
The top, waterfall panel, backsplash, and related pieces should be reviewed together when visual continuity is important.
12. Keep Approval Comments in One Controlled Trail
A dry-lay record becomes much less useful when feedback is scattered across email, WhatsApp, screenshots, marked-up images, and verbal calls without one final reference.
A clearer review comment identifies:
project or area;
Zeichnungsüberarbeitung;
master photo reference;
piece ID or joint reference;
what is accepted;
what needs adjustment; and
what remains pending.
Better Approval Language
“Dry-lay arrangement for pieces W01–W12 accepted visually per Master View B, drawing revision R04. Please revise the W07/W08 joint relationship and return a new detail image before final cutting release.”
This is much more useful than a message such as “looks good.”
13. Separate Dry-Lay Approval From Fabrication Release
Dry-lay photography can support a visual approval, but it should not automatically be interpreted as approval of every other project condition.
The record may confirm:
piece sequence;
color grouping;
pattern direction;
joint relationship; or
visual arrangement.
It does not by itself confirm:
structural adequacy;
installation method;
site dimensions;
support design;
packing performance;
shipping condition; or
other project responsibilities outside the reviewed photographic scope.
The approval record should therefore say exactly what has been approved.
When Should the Dry-Lay Record Be Repeated?
A new review may be required when a material change affects the relationship that was previously approved.
□ A slab is substituted
□ Piece dimensions change
□ The drawing revision changes the layout
□ A seam or panel division moves
□ A piece is recut
□ An important component is replaced
□ Orientation changes
□ A new visible face or return is added
The key question is not whether something changed, but whether that change affects what the original dry-lay approval was intended to confirm.
Recommended Quartzite Dry-Lay Photography Set
For a visually important multi-piece Natural Quartzite project, a practical photography package can follow this structure:
Photo
Zweck
01 — Master Whole-Set View
Show the complete proposed arrangement
02 — Piece-ID Overview
Make important component references identifiable
03 — Left / First Zone Detail
Show movement and joint relationships
04 — Center Zone Detail
Show main focal area or transition
05 — Right / Final Zone Detail
Complete the sequence
06+ — Exception Details
Document cutouts, miters, tonal changes, repairs, or special interfaces requiring review
More photographs are not automatically better. The objective is complete coverage with clear traceability.
Quartzite Dry-Lay Photography Checklist
□ Complete set is visible
quartzite-dry-lay-piece-id-packing-traceability
□ Piece IDs correspond to current drawings
□ Drawing revision is recorded
□ Sequence is understandable
□ Viewing direction is clear where relevant
□ Seams and miters remain visible
□ Returns and smaller pieces are not omitted
□ Lighting is reasonably consistent
□ Detail photos can be traced back to the master view
□ Comments identify exact piece or joint references
□ Approval scope is stated clearly
□ Re-review triggers are defined
FAQ
1. What is the most important photo in a Quartzite dry-lay record?
Die Gesamtansicht des Hauptsets ist in der Regel die wichtigste, da sie dem Prüfer ermöglicht, zu erkennen, ob alle wesentlichen Teile vorhanden sind, und deren gesamte visuelle Beziehung zu erfassen. Detailaufnahmen sollten diese Ansicht unterstützen, anstatt sie zu ersetzen.
2. Should every Quartzite dry-lay piece have a number?
[Nicht jedes sehr kleine oder einfache Projekt bedarf eines komplexen Kodierungssystems, doch wichtige Bauteile in mehrkomponentigen Projekten sollten über stabile Referenzen verfügen, die die Rohbauzeichnungen mit Ausführungszeichnungen, Qualitätskontrollhinweisen, Verpackungsangaben und Montageinformationen verknüpfen, sofern erforderlich.].
3. Why should the drawing revision be included with dry-lay photos?
Abmessungen, Paneelunterteilungen, Ausschnitte, Nähte, Umschläge und sichtbare Flächen können sich zwischen den Revisionen ändern. Die Dokumentation der Zeichnungsrevision macht deutlich, welche Projektanordnung die Fotografie tatsächlich abbildet.
4. Can close-up photos replace a complete dry-lay photograph?
Nein. Nahaufnahmen sind nützlich für Verbindungen, Ausschnitte, Farbübergänge, Gehrungen oder besondere Details, doch sie können nicht zeigen, ob das gesamte vorgeschlagene Set als eine einzige Komposition zusammenwirkt.
5. Should seams remain visible in Quartzite dry-lay photography?
Yes. Proposed seams, joints, and changes of plane should remain understandable so reviewers can evaluate how the natural movement relates across separate pieces. The photograph should not create the false impression of a joint-free installation.
6. Does approval of dry-lay photographs authorize installation?
Nein. Die Trockenverlegungsfotografie ist in erster Linie ein Werkzeug zur Dokumentation von Visualisierungen und Projektabläufen. Genehmigungen hinsichtlich Installation, Tragwerksplanung, Bauwerkskonstruktion, Baustelleneinrichtung sowie sonstige technische Freigaben unterliegen weiterhin den verantwortlichen Projektbeteiligten und der jeweils geltenden Projektdokumentation.
7. When should a Quartzite dry lay be photographed again?
Eine neue Überprüfung kann erforderlich sein, wenn eine Platte ausgetauscht wird, ein Stück neu zugeschnitten wird, sich die Abmessungen ändern, eine Naht verschoben wird, sich die Ausrichtung ändert oder eine andere Änderung das visuelle Verhältnis beeinflusst, das der vorherige Trockenverlegeplan zu bestätigen vorgesehen war.
Final Documentation Rule
A useful Quartzite dry-lay record should allow a new project team member to understand what pieces were reviewed, how they were arranged, which drawing revision applied, where the important joints and directions were, what was approved, and what still required action without reconstructing the project from scattered photographs.
For multi-piece Natural Quartzite projects, HRST STONE can coordinate finished-piece numbering, CAD and shop drawings, dry-lay arrangement, visual QC, production photography, packing references, and other project documentation according to the confirmed scope. Send Josh the current drawings, piece quantities, required finish, visual priorities, key seams or interfaces, material references, and delivery destination when requesting a project-specific dry-lay review.
Hi, I am the author of this article. I have been working in the field of Natural Stone for more than 15 years. If you need customized Natural Stone services, please feel free to contact me.